


's Blog
Basements Quick and Easy part 1
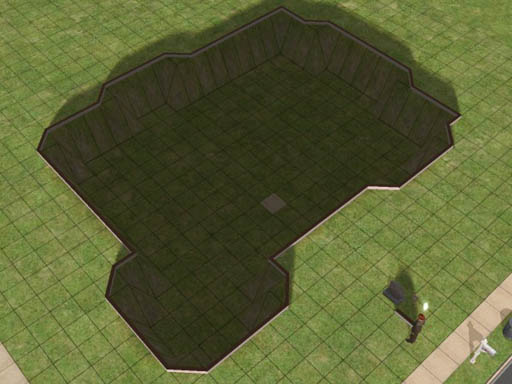
1. Start out by using the wall tool to lay out the outer perimeter of
your house's foundation.

1. Lay out the foundation
You can put a lot of planning into exactly where things will be in your
new home, or you can do what I just did and sort of wing it. At this
point I really don't know what the finished house will look like but I
thought that since this is corner lot, a nice turrety kinda thing will
look nice in the neighborhood.
I figured I wanted a front porch that's six squares wide and the rest is
just sort of intuitive, based on whatever instinct I've developed from
building lots and lots of houses in The Sims 2.
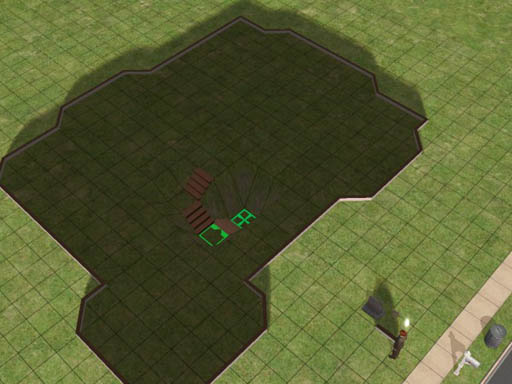
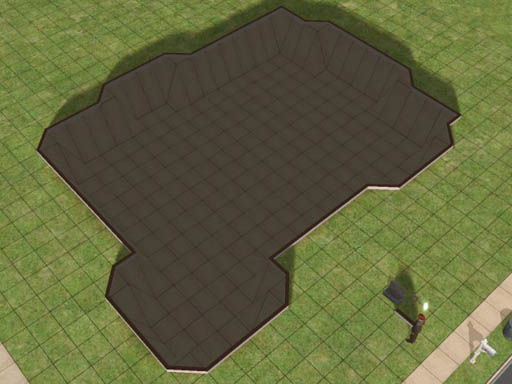
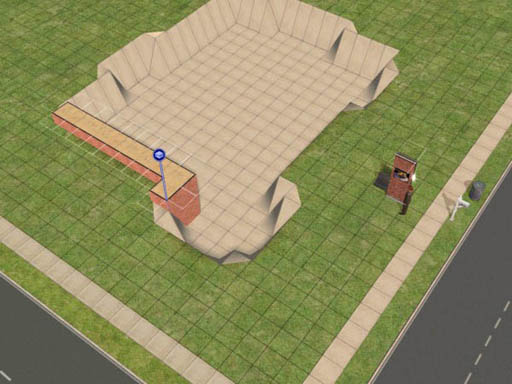
2. Now we need to establish the level of the basement floor.
In The Sims 2, using the shovel tool to move terrain up or down 16
clicks will be exactly the height of a wall. A normal foundation on
level terrain is 4 clicks high, and so is a short staircase. So let's
save ourselves a lot of time and just use the stair tool as our
measuring guide.

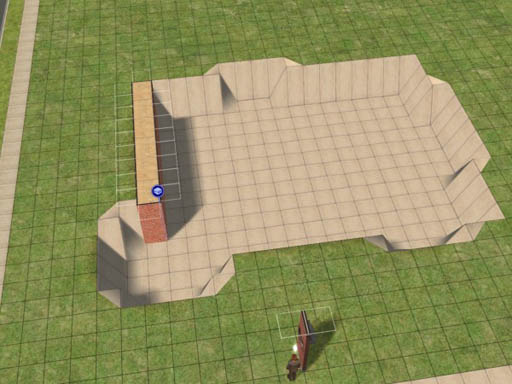
2. The staircase tool takes us down 4
clicks.
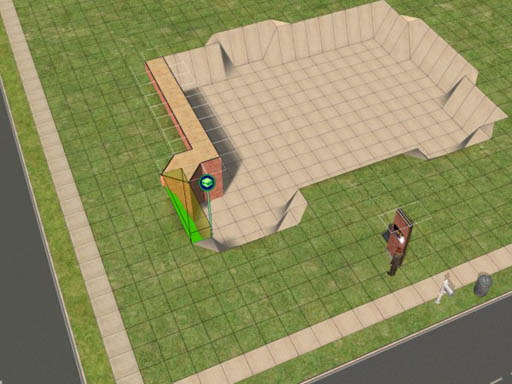
If we start at the lower landing of the stair we just built and go down
another level, and then do it once more, we end up exactly 12 clicks
below ground. We want our basement walls to extend 4 clicks above
ground to accommodate a normal foundation height, so now we know just
the right level!
3. Three flights of stairs down takes
us to the depth we need.
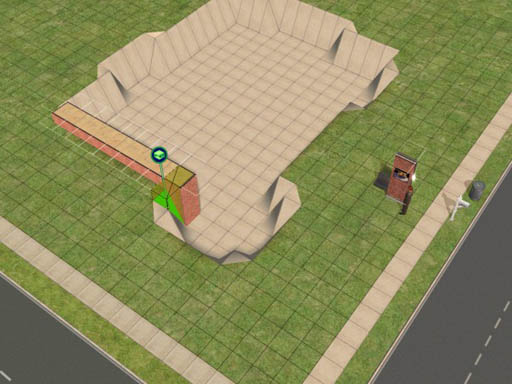
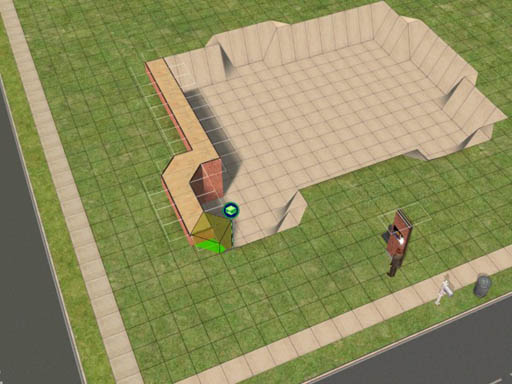
Now, while have the stair tool in hand, just hold down the control key
and delete the stairs. They served us well as a measuring device but
now we are done with them. I put a floor tile on the bottom level to
make it easier to see where we are.
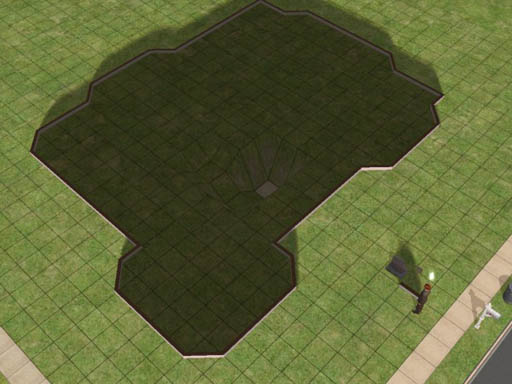
4. Delete the stairs. They were just a
measuring tool.
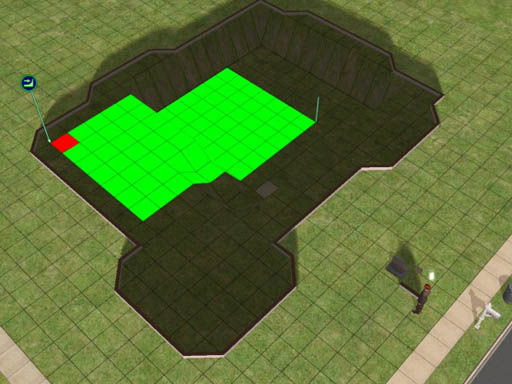
Now it's time to level out our whole basement floor. With the shovel's
"level terrain" tool selected, we start at the one square and sweep
toward the outer walls, stopping 1 square short of the perimeter.
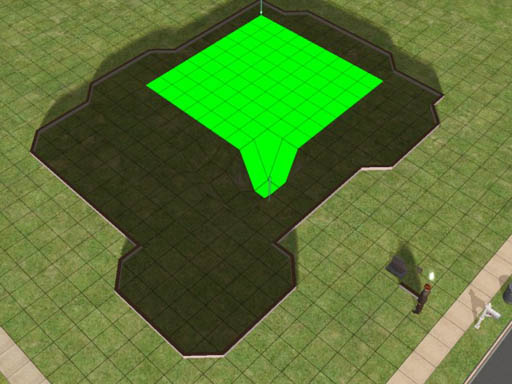
5. Flatten the basement floor out to 1
square short of the perimeter.
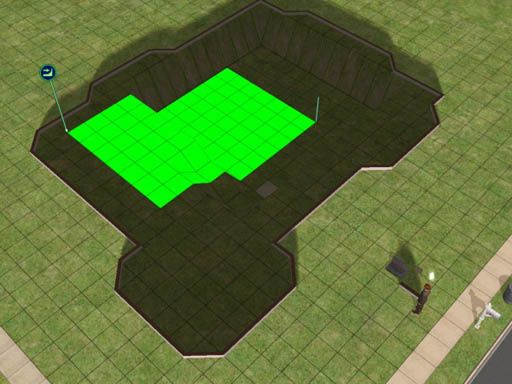
Release the shovel tool and the floor flattens out. Now you can see why
we stopped 1 square short. Those outermost squares become the sloping
sides of the basement.
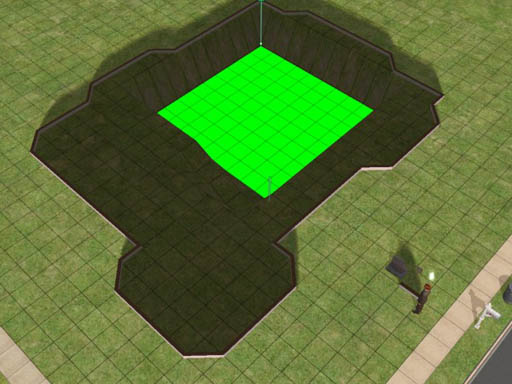
6. The squares nearest the outer
perimeter form the sloping cliff face.
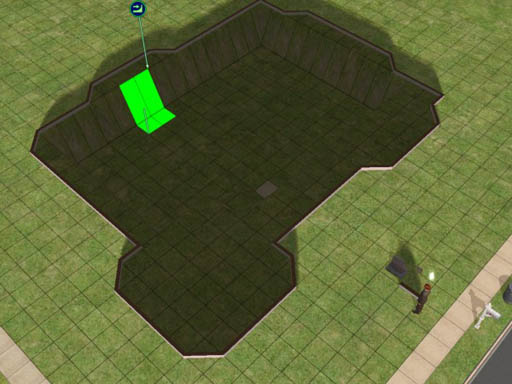
If you go too near the edge, the game will whine at you.
7. You can't select the squares right
at the edge.
8. When you hit red, back off one
square and let it flatten.
Incidentally, that's Wilhelm Smythe watching the construction in
progress. He's just here to keep me company while I'm digging.
9. You can get a couple of more squares
of flat floor from those bays, giving the basement a more interesting
shape.
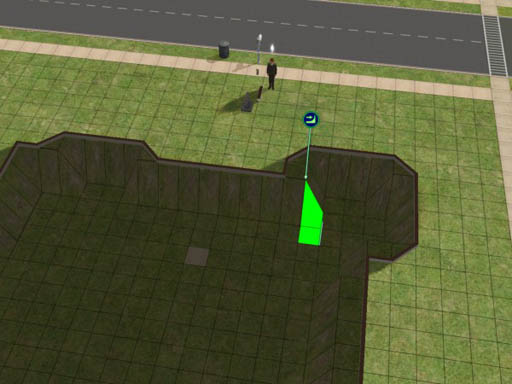
10. Sometimes you can sneak up on a
sloping edge to flatten a little bit more basement floor.
11. Our excavation is done!
I don't like to leave green turf on the sloping walls. In this house I
fixed that by paving over the entire basement in concrete. That was
easy to do because the perimeter walls are still there. I just selected
one tile in the basement and held down the shift key.
12. Pouring the concrete.
Now we're ready to add the foundation. Start by deleting the perimeter
walls. Then construct a foundation just one square wide all around the
perimeter.
You select where you want the foundation to go by selecting (1) the top
outer corner of the starting square and sweeping to (2) the bottom
corner of the ending square, diagonally opposite where you started.

13. Build the foundation with its outer
wall right along the cliff face and its inner wall on the basement
floor.
14. See how it works?
Work your way around the perimeter, always starting on the foundation
you've already built. This assures that you have a consistent level for
the whole first floor of your house.
15. Turn the corner and build the next
segment.
16. Use the diagonal foundation tool to
line up the outer edge where you need it.
17. Keep working your way around,
building the foundation along the edge of the cliff.
18. The concrete we poured earlier
gives us a nice reference for the diagonal edges.
Installation Order for Expansion Packs
Although there are no specific instructions from EA on how to install or reinstall all the Expansion Packs and Stuff Packs for The Sims 2, conventional wisdom seems to think that it's a good idea to install them in the order that they were published:
- Base Game: The Sims 2*
September 17, 2004
- Patch: The Sims 2
- Expansion Pack: University March 2, 2005
- Patch: University
- Expansion Pack: Nightlife September 13, 2005
- Patch: Nightlife
- Expansion Pack: Open For
Business March 2, 2006
- Patch: Open For
Business
- Stuff Pack: Family Fun Stuff April 13, 2006
- Patch: Family Fun
- Stuff Pack: Glamour Life
Stuff August 13, 2006
- Expansion Pack: Pets October 17, 2006
- Stuff Pack: Happy Holiday
Stuff** November 2006
- Patch: Pets Body Shop December 2006
- Patch: Pets Not published yet.
- Expansion Pack: Seasons Probably coming in March 2007
You can also download this list in a printer-friendly Microsoft Word
file. (That's .doc format.)
IMPORTANT: If you have a working game, back up your entire game before
installing any of the expansion packs!
Yes, it does take a lot of time
and a huge amount of disk space to make a backup copy of your game, and
there's almost half a chance that you won't need the backup.
Nevertheless do it! The fan
boards are filled with sob stories from people who didn't make a backup
first; you don't want to be one of them!
All you need to do is:
- select your The Sims 2 folder,
- control-C to copy,
- navigate to somewhere else on your machine, and
- control-V to paste.
Then take a long break while your machine copies
the files.
If you are installing from scratch, it's going to take you all day to
reinstall this software. You can afford the time it will take for your
computer to make a copy of your The Sims 2 folder. If you have a
separate physical disk drive installed in your computer it's a really
good idea to send the backup copy to that disk so that you will be
protected from a hardware failure.
*The Sims 2 Holiday Edition includes Holiday Party Pack, released November 17, 2005
**The Happy Holiday Stuff Pack includes the original Holiday Party Pack with about 20 new items added.
How to Edit Family Relationships in SimPE
How to Edit Family Relationships in SimPE
Part 1
1. Open SimPE.
2. Select a neighborhood.
3. Make a backup of the neighborhood.
4. Did you make a backup?
- a. Yes: Continue.
b. No: Go to step 3.
5. Open the neighborhood, and make sure you're opening the right one!*
6. Are you sure you want to make the planned changes to this house?
- a.
Yes: Continue.
b. No: Stop. Go back into your game and check out the household before you mess it up.**
How to Edit Family Relationships in SimPE
Part 2
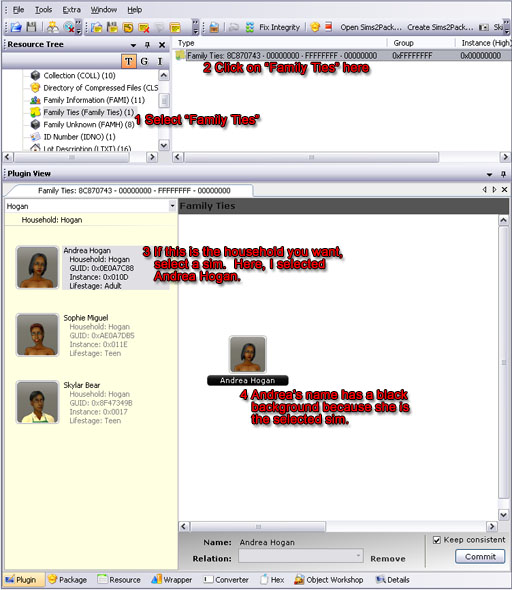
Select a sim whose relationships we
will mangle.
If the family you want isn't the one selected when you first open the
Family Ties tool (which is very likely), look in part 5 of this tutorial
(below) for how to find the right family and how to pick people from
other households.
In this case, our victim is Andrea Hogan in Bonnyview Shores. Andrea is
the target because when I opened the Family Ties tool, the Hogan family
happened to be the one selected. I saw that Andrea was living with two
people and related to neither of them so they had the misfortune of
becoming the victims for this exercise.
How to Edit Family Relationships in SimPE
Part 3
Now let's add Sophie Miguel to Andrea's family.
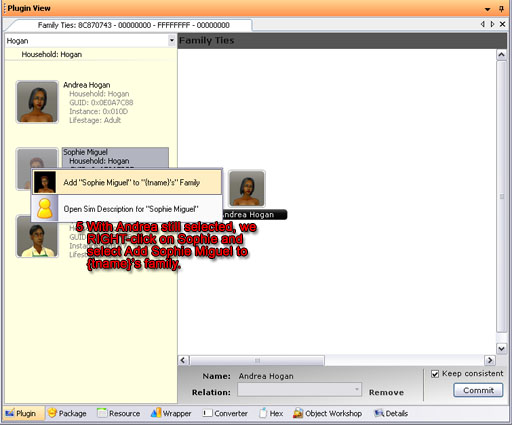
RIGHT-click on the target sim.
Note that Andrea is still selected and we are still in the Hogan
household. I right-click on
Sophie to select her. The menu pops up and I choose to add Sophie to
Andrea's family.
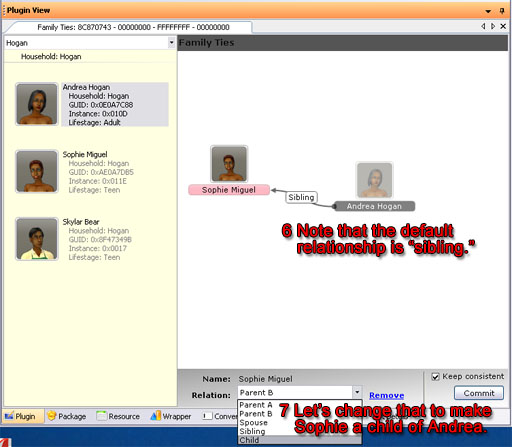
Make Sophie Miguel a child of Andrea
Hogan.
Click on Sophie in the family area to select her. Then use the
pull-down menu at the bottom of the window to make her Andrea's child.
How to Edit Family Relationships in SimPE
Part 4
Now to try something really weird. Let's marry teen Skylar Bear to
adult Andrea Hogan. Right-click on Sklyar, add him to Andrea's family,
and then select "spouse" from the pull-down at the bottom of the window.
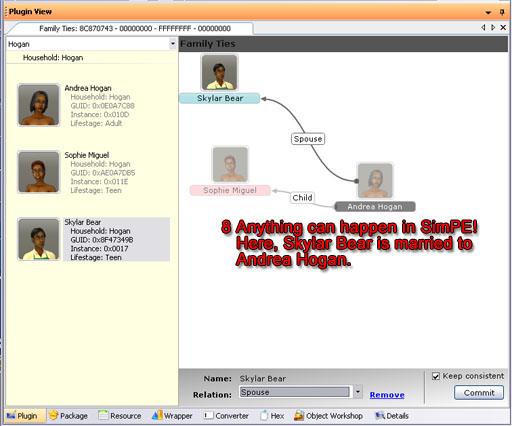
Skylar Bear and Andrea Hogan are
married.
Note that males are
highlighted in blue and females in pink.
In any other neighborhood, they might have thought it odd for Skylar to
get married while he was still in high school, but this is, after all,
Bonnyview Shores, where normalcy is the only weirdness.
Andrea thought it was just a passing fancy, a mere dalliance, but Skylar
takes his responsibilities seriously. Here is the real reason he
married Andrea:
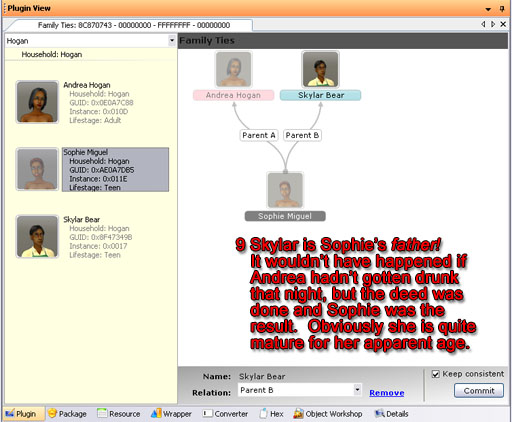
Skylar is Sophie's father!
To complete Sophie's set of parents, I selected her in the left-hand
column. Then I right-clicked on Skyar to add him to her family.
Skylar came in as Sophie's sibling. I changed that to make him Sophie's
father. Sophie is a teenager, so he must be having a terrible time
getting through high school. Maybe it's all the time he spends working
that cash register at the local supermarket; no time for studies. We
all know that Sophie is quite precocious but until tonight I had no idea
just how precocious she is!
How to Edit Family Relationships in SimPE
Part 4
Now to try something really weird. Let's marry teen Skylar Bear to
adult Andrea Hogan. Right-click on Sklyar, add him to Andrea's family,
and then select "spouse" from the pull-down at the bottom of the window.
Skylar Bear and Andrea Hogan are
married.
Note that males are
highlighted in blue and females in pink.
In any other neighborhood, they might have thought it odd for Skylar to
get married while he was still in high school, but this is, after all,
Bonnyview Shores, where normalcy is the only weirdness.
Andrea thought it was just a passing fancy, a mere dalliance, but Skylar
takes his responsibilities seriously. Here is the real reason he
married Andrea:
Skylar is Sophie's father!
To complete Sophie's set of parents, I selected her in the left-hand
column. Then I right-clicked on Skyar to add him to her family.
Skylar came in as Sophie's sibling. I changed that to make him Sophie's
father. Sophie is a teenager, so he must be having a terrible time
getting through high school. Maybe it's all the time he spends working
that cash register at the local supermarket; no time for studies. We
all know that Sophie is quite precocious but until tonight I had no idea
just how precocious she is!
Part 5
You can add sims from all over the neighborhood to your sim's family.
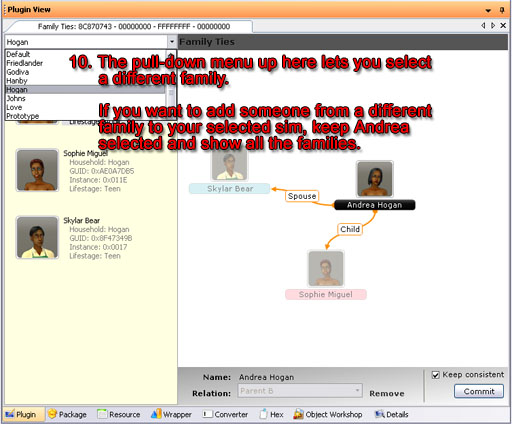
The pull-down in the upper left selects a family.
If you have Andrea selected and choose a family other than "Hogan" she will disappear. However, if you choose "All Households" she'll stick around and you can add anybody to her family.
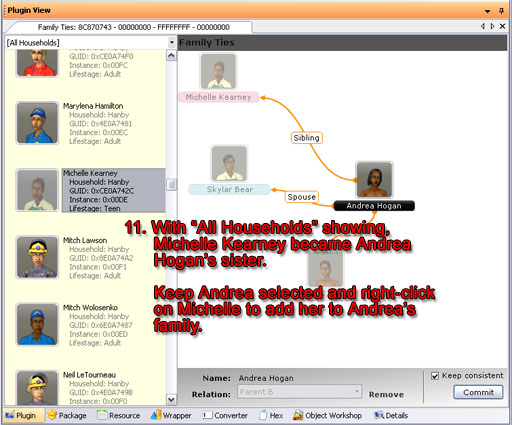
Michelle Kearney and Andrea Hogan are sisters!
Part 6
Skylar finally found out who his real parents are. Now he wishes he didn't know.
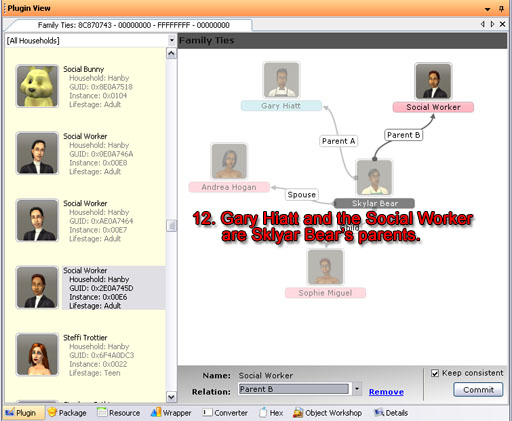
Parents for Skylar
Even NPC's can be parents. Skylar learned that he was Gary Hiatt's woods colt, out of the furshlugginer Social Worker! No wonder she is the way she is! She couldn't keep her own child so now she runs around kidnapping other people's children!
I faithfully backed up Bonnyview Shores before I made that mess. Then when I started my game I went looking among the gazillions of houses in Bonnyview Shores for the Hogan family.
They're not there! I was editing Lake Dorothy!
But oh, it gets worse! Sophie Miguel's family tree turned out fine...

... b'b'b'but...
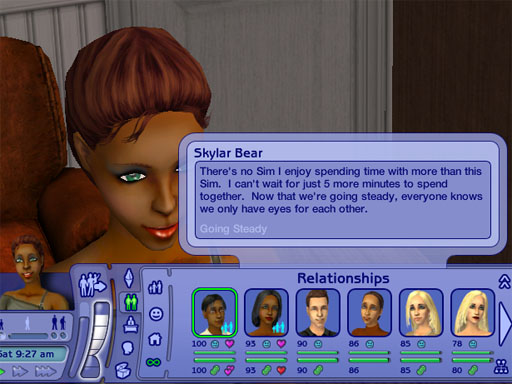
And if it's not bad enough that she's going steady with her father, look at how she feels about her mother!
Aaarrrggghh! So much for the sane society of Lake Dorothy!
Something in my room?
I am so bored.. Hard day ... (Not)
The weather is not helping.
Sooo bored... Deepp sleeeeeeeeeeeep
How to create Cheat Shortcut
I can't remember who first told me how
do to this, but for those who frequently use cheats for building
houses, this tutorial should save you a lot of time when making a house.
First, open up the "My Computer" icon on your desktop and go to:
C:\Program Files\EA Games\The Sims 2\TSData\Res\Config\
Note: if you are using Sims2 university, go to: C:\Program Files\EA Games\The Sims 2 University\TSData\Res\Config\ instead.
In that folder, you will see a file called globalStartup.cheat
Right-click on the file, and select "Open With..." from the menu.
Choose to open the file with Notepad and select OK
The file should open, and will look something like this:
| # # Sims2 global startup cheat file - this file is run on startup of the # game application. It's meant to reflect "production defaults". # # Do not modify this file locally -- instead create # UserData/userStartup.cheat and modify that. # # ---------- # alias real command brief help full help # ---------- alias exit hide "Hide the cheat console window" "Hide the cheat console window" alias x expand "*Expand the cheat console window" "Hide the cheat console window" alias h help "*Show the cheat help" "Show the cheat help" alias ? help "*Show the cheat help" "Show the cheat help" # ---------- |
Now what we are going to do is add a couple of our own
commands as shown below...
#------------------------------------------------------------------ # mikeInside Cheat Shortcuts #------------------------------------------------------------------ alias m "moveObjects on" "Enables the ability to move normally unmovable objects" "" alias m- "moveObjects off" "Disables the ability to move normally unmovable objects" "" alias s "boolProp snapObjectsToGrid false" "Lets you move objects off the grid" "" alias s- "boolProp snapObjectsToGrid true" "Makes objects snap to the grid" "" alias f "boolprop constrainFloorElevation false" "Enables the ability to change terrain even when there is a building on it" "" alias f- "boolprop constrainFloorElevation true" "Disables the ability to change terrain even when there is a building on it" "" alias t "boolprop testingCheatsEnabled true" "Enables a lot of hidden features that can be accessed by holding shift when clicking on objects" "" alias t- "boolprop testingCheatsEnabled false" "Disables a lot of hidden features that can be accessed by holding shift when clicking on objects" "" alias party "intProp maxNumOfVisitingSims 50" "Allows you to throw big parties when activated on the neighbourhood screen" "" #------------------------------------------------------------------ |
Select this text, and then copy and paste it into Notepad, below the text
that is already there.
Save the file, and exit Notepad.
Now, when you run the game, you will be able to activate
cheats just by typing in a single letter instead of the whole word.
To turn on one of these new cheats, hold down CTRL, SHIFT and C to open up the cheat dialog. Then just type in the letter that corresponds to the cheat of your choice and hit the enter key.
To turn off the cheat, type the same letter that you used to turn it on, except with a "-" after it. For example, to turn off the moveObjects cheat, you would type "m-"
Here is a table of the cheats I included....
|
Cheat |
What it does... |
|
m |
Enables the ability to move normally unmovable
objects |
|
s |
Lets you move objects off the grid |
|
f |
Enables the ability to change terrain even when
there is a building on it |
|
t |
Enables a lot of hidden features that can be
accessed by holding shift when clicking on objects |
|
party |
Allows you to throw big parties if you activate it
on the neighbourhood screen |
You could even try adding your own cheat shortcuts to the
file.
For example, this piece of code:
alias cash "motherlode" "" ""
...would allow you to get $50,000 just by typing "cash" into the cheat console.
Cappuccino Bedroom Set
Hi everyone!
I have a new set and I wanted to share it with you. Cappuccino Bedroom Set.
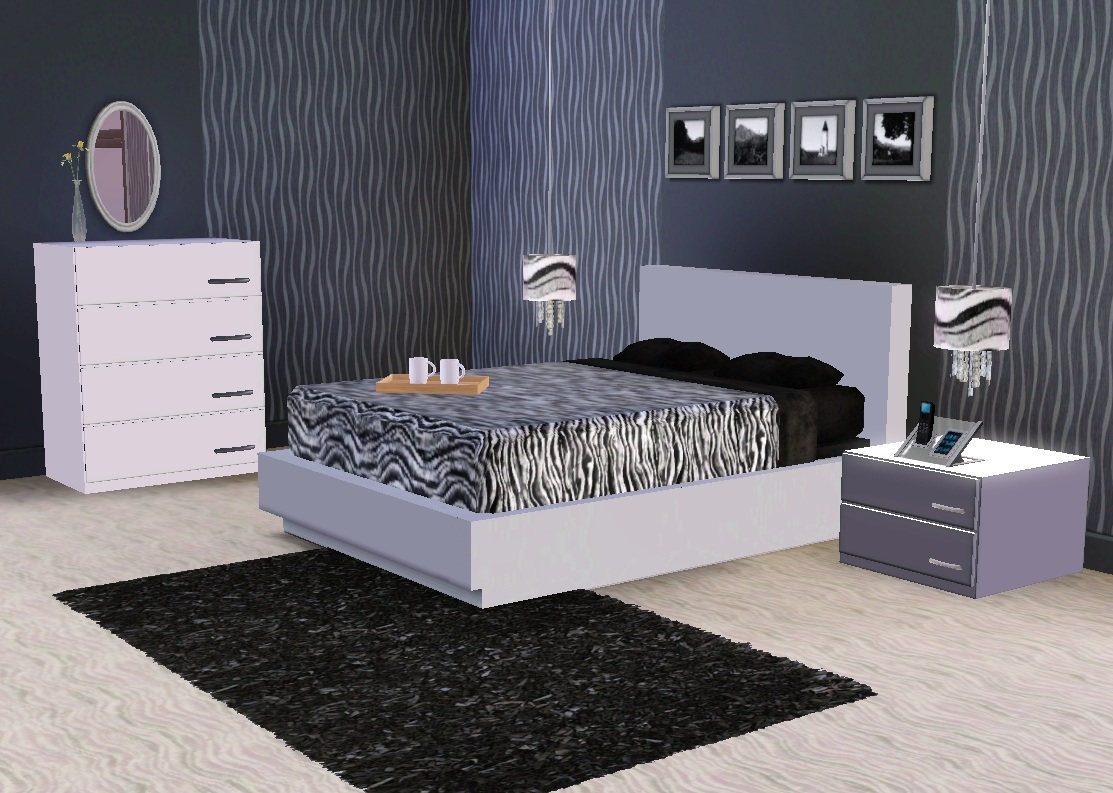
(bed, end table, dresser, lamp, tray and OMSP for beds)
Rug belongs to Cappuccino Livingroom Set.
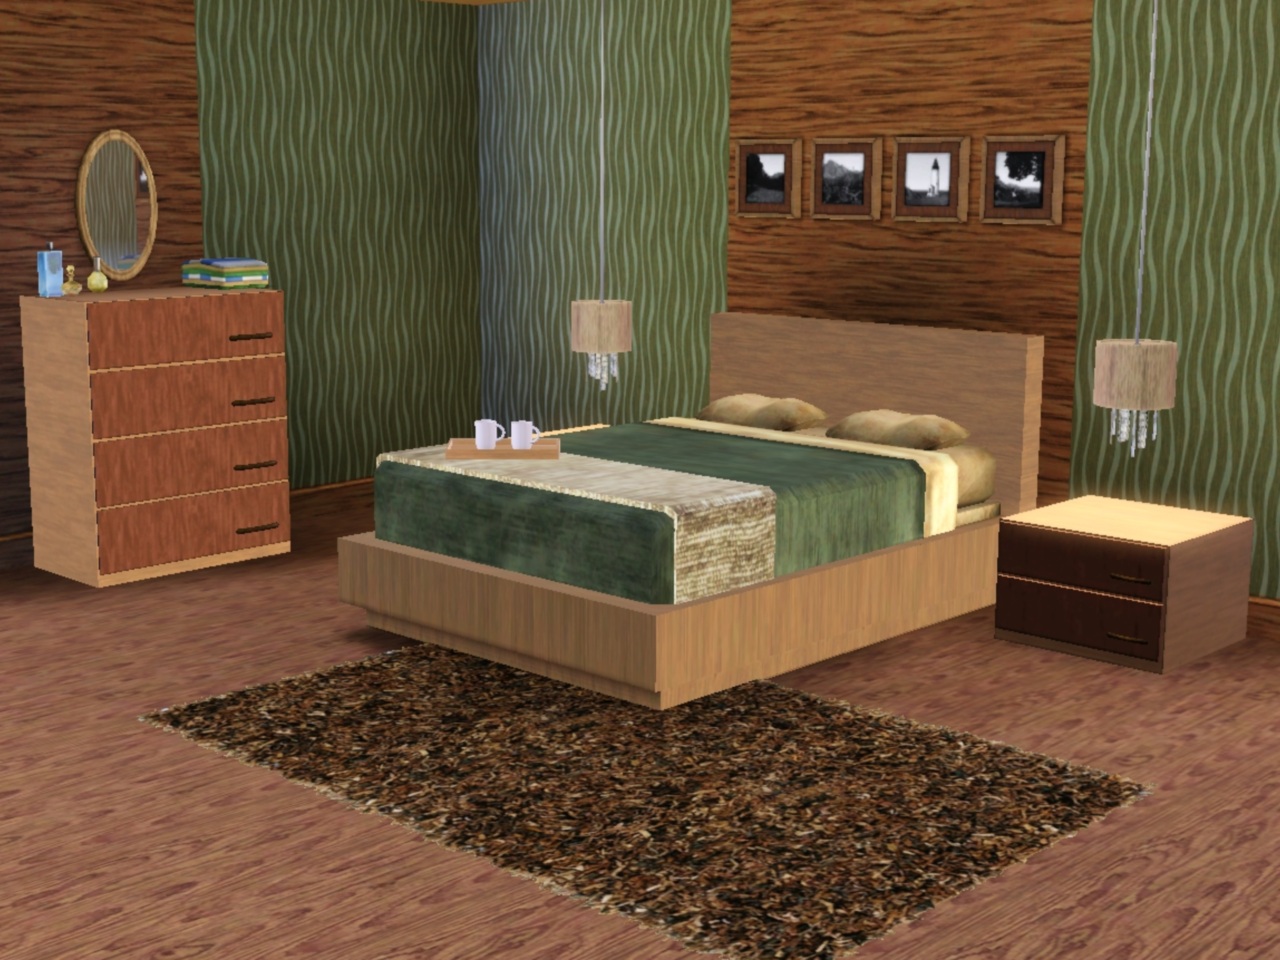
(bed, end table, dresser, lamp, blanket, tray and OMSP for beds)
Rug belongs to Cappuccino Livingroom Set
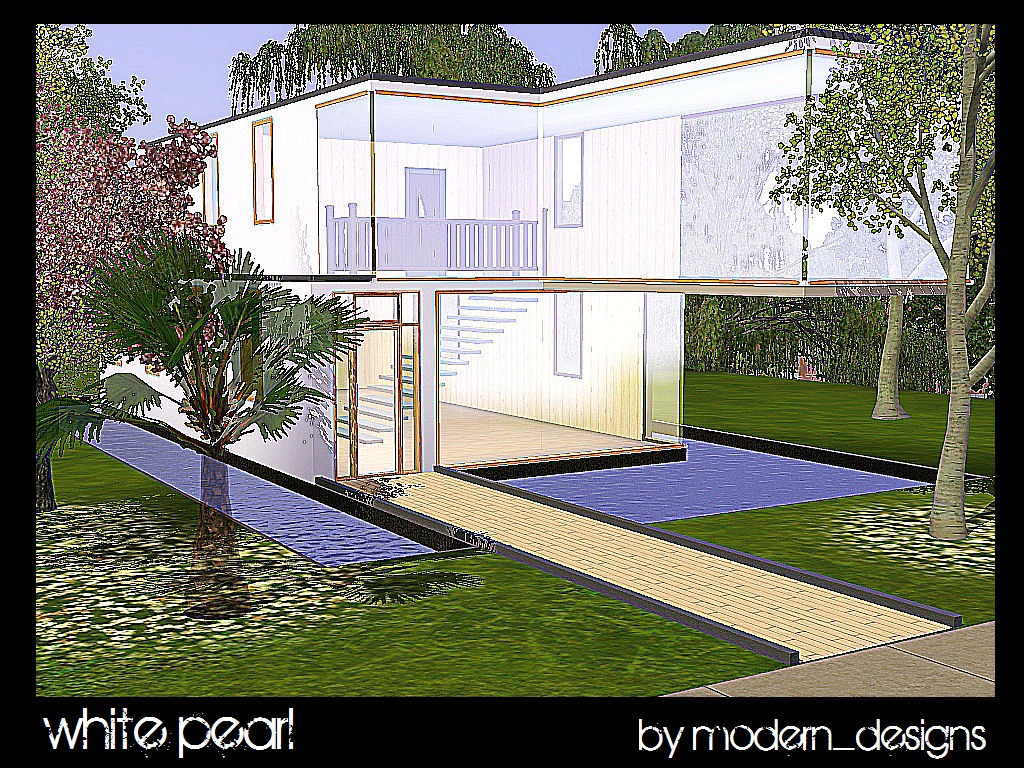
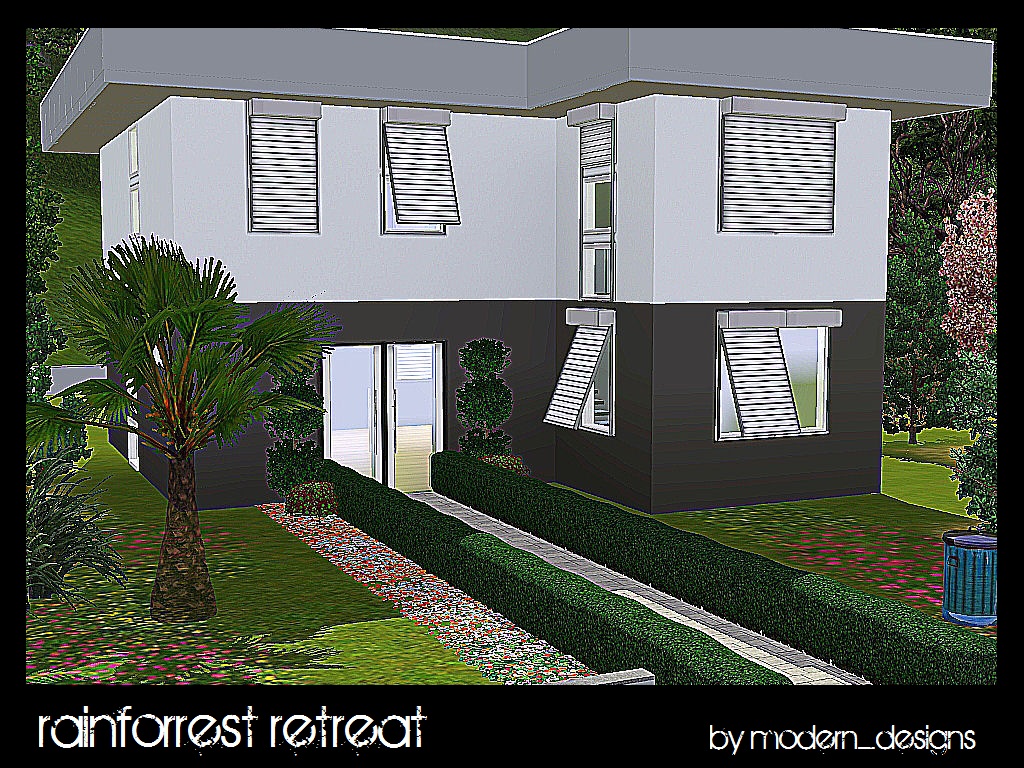
Hello Everyone!! My First Few Creations...
Hi i thought i would start tsr with a blog post! To show my first new creations that will be uploaded when tsr submission is working on my computer. Check them out...

vacation next week
I will be going to San Francisco for a week next week. I'll try to update before I go; otherwise I'll do it when I come back
Have a great summer every one
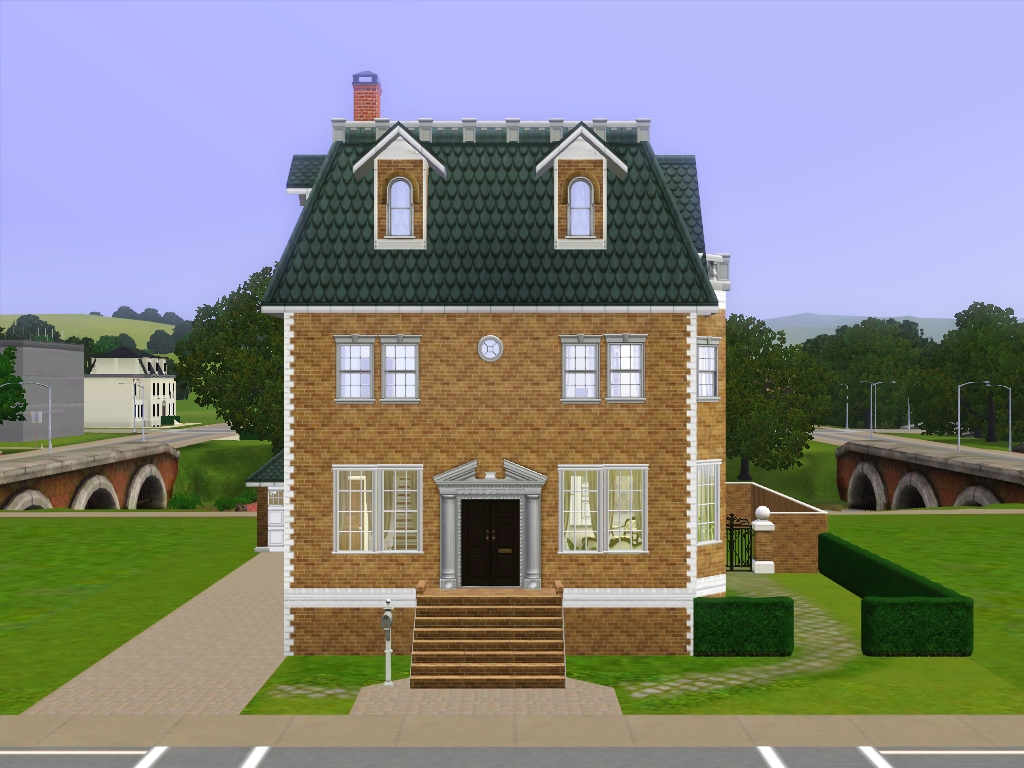
Old Fashioned Community Lots
Hi everyone! I've finished and submitted the last of my community lots. I may create more later and would be happy to take requests if anyone wants something specific. I'm working on 3 townhouses to go with the series which will be similar in style to the market. The one below is just about finished. Thanks so much to everyone who downloaded my lots or who left me comments. I'm so glad others like my creations and I really appreciate getting feedback. Happy simming! Missy


 Limited Time Offer
 For a limited time only, we’re giving away a free