


Submitting your Sims 3 content
Hi and welcome to this guide. This is how you submit your Sims 3 content to The Sims Resource, step by step.
Our submission system is very clever and will extract a lot of relevant data from your Sims3package file automatically, saving you a lot of editing time when submitting. It will even extract a couple of images and merge them together as 2 "default previews". You have the option to use those or upload your own images as well of your own style and design.
Sims3package files are generated when you export your Sims from Create A Sim or your Lots from within the game. Save those to a folder of your choosing so you can easily find them later. Patterns made with our Sims 3 Workshop tool are also saved as Sims3package files automatically.
Rules and Recommendations:
- Lots: We require that you take an in-game picture of your lot - the automatically generated images should be used as complimentary previews.
- Sims: We recommend that you take your preview image from Create A Sim - this image looks much better then the automatically generated image.
- Patterns: We require you to submit an image that show how the pattern tiles on a surface or clothing, otherwise your submission will be rejected.
- Make sure to enter the required attributes and select the proper category for you creations, otherwise your submission will be rejected.
- Please take the time to enter a proper title and description, as well as keywords (for example color and pattern motive).
- DO NOT use titles such as myname_24556_v2, use a descriptive name such as Floral Pattern v2 instead.
Detailed Instructions
For a comprehensive guide on Submitting your Sims and how to prepare them from the game/Create A Sim, take a look at this guide that include images.
Step 1 - Upload your Sims3package file
Step 1.1 - Upload a new file
On the very first page you have an upload form. Simply browse for your Sims3package file available on your computer (where you saved it) and click "Upload File".This will take you to the next step.
Step 1.2 - Choose a file from your Filestorage
If you have files uploaded in your Filestorage you will have the option to choose one of those files for submission.
- Simply choose the option "Get it from my Filestorage" and click on "Next Step »".
- This will reload the page and create a list with all your uploaded files. Choose the file you wish to submit and click on "Use Selected" to proceed to the next step.
To upload files to your Filestorage just click on the Filestorage tab and upload your files there. Those filles will remain in your Filestorage until you choose to delete them (recommended after submission).
Step 2 - Edit your Submission
Once your file is uploaded through one of the options described above you will end up here, in Edit mode. Here you can do the following (depending on content type there will be different fields here):
- Choose a title - this is the name of the file as it appears on the site. Make sure it is a short and obvious title (retro wallpaper instead of AF289 RTWP for example).
- Enter a description - this should also be as obvious as possible and describe the item in question. A good description will help you get high in search results as well as linkbacks from Google.
- Add notes - this is optional and should be used if you want to clarify something, such as what tool was used, if th item can be shared freely etc.
- Add keywords - this is optional and used by our site's searchengine. It is important if you want to make sure you end up in relevant searches on the site.
- Choose categories - The default category has already been added here but you can choose additional categories as well.
- Choose theme - This is only relevant if you have created a themed creation.
- Edit Attributes - Here you set the relevant Attributes, depending on creation type. For Lots you will have several different attributes to choose from, for Patterns there will be only a few.
- Upload/edit images - Depending on creation type there will already be images here taken and prepared from the sims3package file. You can add 2 additional images of your own style and design, or alternatively remove all images and upload 4 new images of your own style and design. You can move the display order of the images here, please note that the first image will be displayed as the preview image on the site in gallery and standard view.
Once you are done with this step simply click "Continue" to proceed to the third and final step.
Step 3 - Preview and Approve Your Submission
Here you will get a preview of how the submission will look like on the site. Make sure everything is correct and hit "Submit" - you are done! Your submission will now be reviewed and either approved or rejected (with a given reason) by our submission manager.
Quality Assurance
We want everyone to experience the rewarding feeling you get from sharing your Sims 3 creations with our community. That said, we also need to maintain a certain standard of quality in our databases. We also appreciate that everyone has to start somewhere and your first creations will almost certainly not be your best! Many people who go on the be top quality artists ask to have their earlier creations removed because of the quality, so please don't feel offended if your first submission is bounced back to you with an explanation of why, and how to improve it.
The most frequent cause of a rejection is not the quality or style of the creation but the poor quality preview image submitted with it. This is your best method of "selling" your creation to other players. If your preview image looks bad, people will be put off and are unlikely to download it. They can also make our databases look a bit messy so we are tightening our rules a bit in this area. A good preview image can take a fraction of the time it takes to create a great looking download so we see no excuse for not doing them. Below are 2 examples of what you should and should not do with a preview. These are assuming that you are submitting a new Pattern which you design.
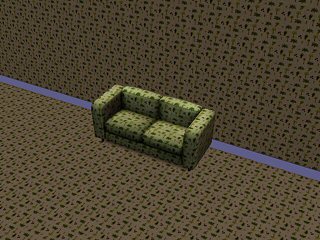
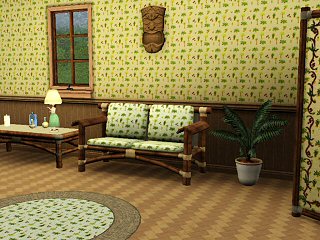
The first preview shows the pattern on the wall, floor and chair and is quite frankly a very poor effort (we see this a LOT). The second image shows that with very little effort, you can place some items in your game in a way it does far more justice to your work and is more eye catching for the downloader.
Minimum Requirements
Different types of creations have their own unique requirements:
Patterns/Materials: We will only accept "seamless patterns", meaning that they tile perfectly on all 4 sides. This is essential for allowing users to handle all CC in the same way as the game base game content. This makes it useable in Create-A-Sim and Create-A-Style for all content in the game. Simply applying a team emblem or logo in the middle of a tile is not good enough. It might look acceptable on one item, but it's not useable around the entire game. There must also be at least 1 recolorable pallet.
Houses & Lots: You should submit at least 2 good screenshots of your Lot which give a good overview of what the downloader can expect to get both internally and externally. You should try to avoid using lots of EA Store items or Custom Content created by other players and Expansion Pack content too. Remember that people can put their own designs on Lots once they are in their game! What appear to be "test lots", i.e. a box with no external decoration or landscaping will be rejected. TSR can be a great place to launch your creations into the spotlight, so give us your best work!
Sims:


 Limited Time Offer
 For a limited time only, we’re giving away a free
There hasn't been any comments yet, be the first to post one!