

 Sign In


Sims 3 Level of Details (LODs) Tutorial
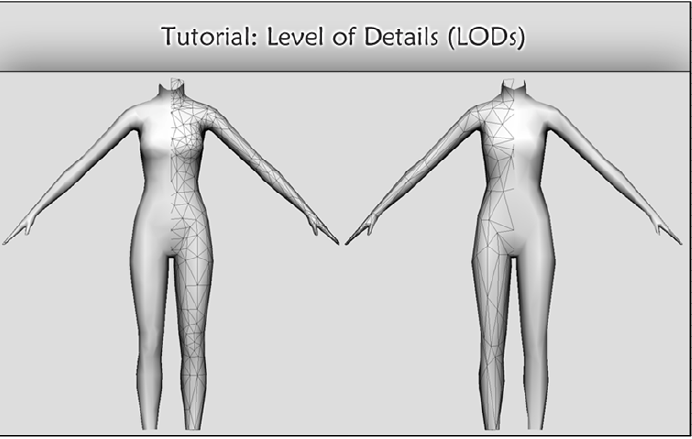
This Sims 3 Level of Details (LODs) tutorial will help you with creating Level of Detail meshes in an efficient way. Efficient means that we want to increase the performance noticeably, spend as little time as possible and still keep our model visually appealing at all stages.
Before you begin, you will need:
- MilkShape 3D (program for importing / exporting meshes)
- TSR Workshop
- Balancer Lite (program for reducing number of polycounts)
- UniMesh plugins (extract the UniMesh plugins in your MilkShape directory)
- Mesh Toolkit (multifunctional program, in this case: program for creating
morphs and re-assigning bones)
So, let’s go!

Run MilkShape 3D > File > Import > TSRW Object > select your set of .wso meshes from your computer
Delete other meshes (group_fat, _thin, _fit and _special), leave just group_base. As you can see in the picture, I renamed group_base to HIGH LOD.
Now I want to make MEDIUM LOD of this mesh, but I first need to save this mesh to desktop … File > Export > Wavefront OBJ …
During exporting, the mesh will lose a list of bones which we’ll correct later.

Make sure that you have installed the program called Balancer Lite on your computer.
After downloading this program, in the folder you will see that you have two
programs: Balancer Demo and Balancer Lite.
Install only Balancer Lite if you want a full free version. Free version works with small meshes only. The limit for a single mesh is 15.000 polygons which is quite sufficient for the needs of The Sims 3 game.
Balancer Demo is evaluation version which supports importing meshes with a very high polygon count.
Open obj mesh in this program … you will see orange lines on the mesh. They are lines of boundaries.
- You can turn off orange lines of boundaries by pressing on the button (see
number 1.), but I recommend that it’s turned on. - Pressing on the button ‘Build’, your mesh is ready for destroying, i.e. you will be able to use scale of resolution. This program has two ways for this: Entire Hierarchy and Hierarchy with Tolerance, but I recommend the first one (Entire Hierarchy).
- You can type any number less than 3710, for example as you can see on in the picture. Or you can type any percentage less than 100.

After pressing on the button “Build,” you’re able to use scale. You have two ways of reducing the number of polygons (triangles):
- You can pull scale by hand or you can …
- …type any number in fields “Faces” or “%”. I’ll write 50 in field “%”, then I need just click field “Faces” and the program will generate changes on the mesh.
- After reducing, mesh got a few gaps on the boundaries. Unfortunately,
boundaries used on each mesh with this program were ruined. So, I have to find a way to protect the border by gaps.
Again open your High LOD mesh in this program.

We’ll protect the borders by joining vertices. As you can see in the picture, simply click on Join Vertices via Tools.
After clicking, lines will become purple instead of orange, except for the boundaries on the neck (they’re still orange).
Mesh is now protected by gaps.

Rotate your model so that we can get a view on the neck. Before reducing the
number of polygons, lock selected vertices so they won’t be touched & moved during reducing.
Pressing on the button, a sign of thumbtack will be visible on the viewport.
Now we can start with selecting vertices to lock. When moving your mouse to
vertices on the border of the neck, a green dot will pop-up. Click on it and
you’ve locked the first point (red color is sign of locking). If you want to
deselect or unlock a point, just click again on the same point.
That’s all!

The neck of High LOD has 16 vertices as you can see in the picture. The neck of Medium LOD has 12 vertices while the Low LOD has 6 vertices.
So, we want to get a Medium LOD which means that we need to select & lock only 12 vertices. Other 4 vertices will be unlocked & destroyed during reducing the number of polygons.
I’ve marked two points that I recommend to always be locked (because all of the LODs have these points in almost the identical position). So, we see here that we have two points in the middle, 5 points on each side (left and right). You must keep in mind that the left and right side must have identical positions of points.
Also, I’m selected these vertices by investigating & comparing EA High and Medium LOD, this way I realized which vertices from High LOD are closest to Medium LOD.
The result will be that I won’t have to edit the UV Map because it won’t be too much of a difference.

Now, we’re ready to reduce. Click on the button “Build,” Scale back or fill the fields with numbers until other unlocked vertices are destroyed or invisible.
Oh, yeah, make sure to check legs, also. Total number of vertices for legs is the same for High and Medium LOD – 8 vertices. Low LODs have 6 vertices.
So, rotate mesh until we get a look on the feet.

Oh, we have a problem here. Left side is OK and contains 8 vertices, but right side contains only 7 vertices. So, we’ve lost one point. We’ll correct it.

We’ll pull scale back slight until we get 1 point more. Then we will click on the button “Lock” and protect all vertices. Again, rotate the mesh to see the neck.

After protecting vertices on the legs, we can see here that the neck got two unlocked points back. But, we don’t need to worry. Now, we’ve locked all vertices (neck and legs together).

Again, pull scale left. Great, unlocked points are destroyed and invisible. Time to check the legs again.

Here we have 7 vertices on the right leg. But, we can see a single (locked) point outside the border. How can we get back to 8 vertices without affecting the neck? See the next picture.

How? Simple. Just click on the button “Build” and the program will add the
connection to a single point. Time to save. Save this mesh somewhere in your work folder or on the desktop. Rename reduced file however you want. I called it Medium LOD.

Run MilkShape > File > Import > Wavefront OBJ … > pick reduced mesh or
Medium LOD in my case.
It’s very important! You must do this each time. Mesh should be cleaned of joining vertices.
Select the whole mesh by Crtl + A or Edit > Select All.

Go to Tools > Model Cleaner … > first pop-up will appear.
That should be the message like this:

Click NO.

Just click OK.

Afterwards, a mesh will be generated with a material on itself. Go to the tab
“Materials,” delete it by pressing on the button Delete.
OK, now we’ll save this mesh. File > Export > TSRW Object > save or replace old one.
Close MilkShape 3D or just hit File > New.

I want to fix the connection of neck and legs of my Medium LOD. So, I’ll import into Milkshape 3D any EA Medium LOD. I’ve chosen this mesh (it’s a dress from the Base Game, known as “boring maternity dress with blue sheep”).
For my convenience, this dress is similar to my Medium LOD. This will be important later.
So, I’ve imported EA Medium LOD of this dress into MilkShape then I renamed this group_base to EA Medium LOD. Do not close Milkshape!
Re-import your Medium LOD which was saved in the previous step.

OK, I renamed my Medium LOD to MY Medium LOD. You must keep in mind that EA Medium LOD is placed higher while MY Medium LOD must be placed lower.
Why? Because I’ll assign connections for the neck & legs (from MY Medium LOD) to connect neck and legs from the EA Medium LOD.

We have both meshes visible in the Left position. We’ll now select vertices of the neck (only connection). Click on the tab Model > Select > then select vertices of neck.
You can select more vertices by pressing Shift + mouse at the same time.
When we’ve selected all vertices of the neck > press Crtl + I (Invert) + H (Hide) at the same time > other vertices on the body will be hidden except for the neck.

OK, I’m here in the Top position. Now it’s easier to see vertices while other vertices on the body are invisible. But, how can I recognize vertices of MY Medium LOD? I can’t distinguish which points are from which mesh.
So, go to tab “Groups,” tick EA Medium LOD on the list then click on the button “Hide.” Now we have MY Medium LOD visible. Go back to the Left position and select vertices of the neck, again.
We’ll expand slight using Scale (type 1.1 in fields of X & Z + tick button Y because we don’t need it). Press on the button “Scale” two or three times.

OK, now go on the “Groups” tab, tick EA Medium LOD again, press the button “Hide” … mesh is now visible. Select vertices of the neck from both meshes, again. Press Crtl + I + H to hide other joints of the body. Go to the Top position.

Oh, nice! It’s sure is much easier than before, right? Now we’ll re-assign vertices from MY Medium LOD to EA Medium LOD.

Select two vertices as you see in the picture above.

After fixing connection of neck … oh yeah … you must do it also for legs.
Again, after fixing connection of neck and legs, just delete EA Medium LOD.
Make sure that you renamed MY Medium LOD to group_base (it is very important!). You can see here that Medium LOD looks so clean & contains original boundaries from High LOD. Save this mesh. File > Export > TSRW Object (I saved it as EDITED MEDIUM LOD_FIXED).

Run program Mesh Toolkit > go on the tab “Auto tools for WSO” > go on the subtab “Auto-create Morphs.”
In the field “Reference WSO mesh (has morph meshgroups)” – we’ll put the EA Medium LOD which is similar to our HIGH LOD. I’ve chosen EA Medium LOD from previous steps because it is similar enough so it will be good as reference. I think, you can put HIGH LOD as reference, but you’ll have to fix neck and leg connection of other morphs like fat, thin and fit. With EA Medium LOD, you don’t need to edit them, because the program will generate all you need from our fixed MEDIUM LOD (remember, we fixed the connections for neck and legs). Your choice.
In field “WSO mesh to morph” we’ll put our EDITED MEDIUM LOD_FIXED (contains only group_base).
Make sure that you have ticked the option “Do interpolation” (gives better results but may be slow).
Click on the button “Create Morph Meshgroups” and save it on the desktop. I saved it as EDITED MEDIUM LOD_MORPHED.

In the previous steps, we have been working with a mesh which is OBJ format. It means that OBJ meshes do not contain list of bones. WSO meshes must contain a list of bones. So, we need to assign a list of bones from HIGH LOD to our newest EDITED MEDIUM LOD_MORPHED.
We will use HIGH LOD as reference because it contains a list of bones. Make sure to tick options “Replace all bone assignments” and “Do interpolation “(gives better results but may be slow).
Click on the button “Do Assignments and Save.” I saved it as EDITED MEDIUM LOD_FINAL.

Run MilkShape > File > Import > TSRW Object > select EDITED MEDIUM
LOD_FINAL to check other morphs.
You can see a list of groups in this picture:
- group_base
- group_fat
- group_fit
- group_thin
- group_special
For WSO meshes, order of the groups should be:
- group_base
- group_fat
- group_thin
- group_fit
- group_special
So, I ticked group_thin and moved it by clicking on the button “Up.”

OK, I exported this set of .wso meshes. Time for TSR Workshop to check our result.

Click on YES.

Sometimes, although rarely, I get a message like this. OK, we’ll try again. Click on OK.
Again use the icon “Import.”

Click NO.

Click on YES.

We did it! You can use Export then save, i.e. replace EDITED MEDIUM LOD_FINAL and you won’t have any problems with importing back into TSRW (just click Yes on the pop-ups).
Here in the picture (comparison between Normal and Fat) we see that the connection of neck is perfect and without any gaps.
That’s all!
Now, using previous steps (from start) – you need to create a Low LOD using
MEDIUM LOD. All the same!
Useful info: keep in mind that you can sometimes get exploded mesh after importing into TSR Workshop. It may mean that your mesh contains more than 60 bones. You need to make two separate meshes of your whole mesh (it’s mostly the case with HIGH LODs).

I made a new LOW LOD using MEDIUM LOD and this is how it looks. Again, perfect connection of the neck without any gaps.
More informative pictures:

Nice! Medium and Low LOD are so clean and contain original boundaries from High LOD.
You see that other LODs have a substantially lower number of polygons although they look more detailed and very close to High LOD.

Wireframe view

UV Mapped

Textured! This is very good evidence seeing that the texture looks nice on all LODs as the MEDIUM and LOW meshes.
In the end, I hope that this tutorial helped you and that you paid attention to the creation of other LODs.
USEFUL INFO (extra gift for you):
I investigated all meshes by age and I’m sure that this table will be very helpful for creators clothing items.










 Limited Time Offer
 For a limited time only, we’re giving away a free


